Few things are as frustrating as pulling your lawn mower’s starter cord only to have it snap in your hand. This common issue can abruptly halt your lawn care plans and leave you wondering if your mower is destined for the scrap heap. However, a broken pull cord doesn’t have to mean the end for your trusty machine. With a few basic tools and a bit of patience, you can quickly replace a broken lawn mower pull cord yourself, saving money and getting your equipment back in action. This comprehensive guide will walk you through each step, ensuring you have the knowledge to tackle this DIY repair with confidence.
Understanding Your Lawn Mower’s Pull Start System
Before diving into the repair, it helps to understand how your lawn mower’s pull start system, also known as the recoil starter, actually works. This assembly is typically mounted on top of your engine and contains a spring-loaded pulley. When you pull the starter handle, the cord unwinds from this pulley, engaging with the engine’s flywheel to initiate rotation and start the engine. Once the engine fires up, the spring inside the assembly automatically rewinds the cord back onto the pulley, ready for the next start. Common reasons for a pull cord breaking include normal wear and tear, fraying over time, or excessive force during starting. Sometimes, the internal recoil spring itself can weaken or break, leading to the cord not retracting properly. Replacing the cord involves accessing this internal mechanism, removing the old cord, and carefully installing a new one while maintaining proper spring tension.
Essential Tools and Materials for Pull Cord Replacement
Successfully replacing your lawn mower’s pull cord requires a few essential tools and the right replacement materials. Gathering these before you begin will streamline the process and prevent unnecessary interruptions. For best lawn mower roundups on this site.
- New Pull Cord: This is the most crucial item. Pull cords vary in thickness and length, so ensure you purchase the correct size for your mower. Checking your owner’s manual or taking a piece of the old cord to a hardware store for matching is recommended. Most residential mowers use cords numbered 5, 5 1/2, or 6.
- Screwdrivers: You’ll likely need both Phillips and flathead screwdrivers to remove the starter housing. A smaller flathead will also be essential for wedging the pulley.
- Needle-Nose Pliers: These are invaluable for grabbing stubborn cord ends and manipulating knots inside the tight spaces of the recoil assembly.
- Utility Knife or Scissors: For cutting the old and new pull cords to the correct length.
- Lighter: Used to melt the ends of the new cord, preventing fraying and making it easier to thread.
- Work Gloves: To protect your hands during the repair, especially when handling tools and the engine.
- Socket Set (Optional): Some recoil starter housings are secured with bolts that require a socket wrench.
- Eye Protection (Optional): Always a good idea when working with tools and spring-loaded mechanisms.
Choosing a high-quality nylon or polyester braided cord for replacement can offer better durability than generic alternatives, ensuring your repair lasts longer.
Step-by-Step Guide: Replacing Your Lawn Mower Pull Cord
Replacing a broken pull cord is a manageable DIY task. Follow these steps carefully to ensure a safe and successful repair.
Safety First: Preparing Your Lawn Mower
Safety should always be your top priority when working on any engine. Before you begin disassembling your lawn mower, take these critical precautions:
First, ensure the engine is completely cool. Working on a hot engine can lead to burns. Next, disconnect the spark plug wire from the spark plug. This prevents the engine from accidentally starting while you’re working on it, eliminating the risk of injury. It’s also a good practice to remove the fuel tank or at least ensure it’s not full, especially if the repair requires tilting the mower.
Accessing the Recoil Starter Assembly
The recoil starter assembly is typically located on the top of your lawn mower engine. Its exact appearance and attachment points may vary by model, so consult your owner’s manual if you’re unsure.
Begin by locating the screws or bolts that secure the starter housing to the engine. These can range from two to five fasteners. Use the appropriate screwdriver or socket wrench to remove them. Keep these fasteners in a safe place, such as a magnetic tray or a small container, to avoid losing them. Gently lift the entire recoil starter assembly off the engine. In some cases, you may need to remove a plastic top shroud before accessing the actual starter housing underneath. Be careful not to force anything, as plastic components can break easily.
Removing the Old Pull Cord and Inspecting the Spring
Once the recoil starter assembly is off the mower, take it to a clean workbench. You’ll typically see a central pulley or reel where the cord is wound.
Locate the end of the broken cord still attached to the pulley. Often, it’s secured by a simple knot that fits into a slot or hole on the pulley. Use your needle-nose pliers to grasp the knot and pull it out, then completely remove any remaining pieces of the old cord from the pulley and handle. Take a moment to inspect the recoil spring inside the housing. This large, coiled spring is responsible for retracting the cord. Ensure it’s not broken, bent, or dislodged. If the spring itself is damaged, replacing the entire recoil starter assembly might be a more practical solution, as reassembling a broken spring can be challenging.
Rewinding the Recoil Spring for Proper Tension
This is often the trickiest part of the repair, as proper spring tension is crucial for the new cord to retract correctly.
If the spring has fully unwound, you’ll need to manually rewind it. Twist the pulley counter-clockwise (or in the direction it would naturally wind when the cord is pulled) until you feel significant resistance and can’t turn it any further. Hold the pulley firmly in this position. Next, slowly release the tension slightly, allowing the pulley to unwind by about half to one full revolution. While maintaining tension, carefully align the hole in the pulley with the corresponding hole in the starter housing. Once aligned, insert a small flathead screwdriver through both holes to lock the pulley in place. This will prevent the spring from unwinding while you thread the new cord.
Preparing and Threading the New Cord
With the spring tension set and the pulley locked, you’re ready to install the new cord.
Measure your new pull cord to match the length of the old one, adding about four to six inches for the knots. Cut the cord with your utility knife or scissors. To prevent fraying and make threading easier, carefully melt one end of the new cord with a lighter. Once melted, quickly twist it between your fingers (be careful, it’s hot) to create a firm, pointed tip. Now, thread the melted end of the cord from the outside of the starter housing, through the aligned hole, and then into the hole on the pulley. Pull enough cord through to tie a secure knot inside the pulley mechanism. Ensure the knot is tight and won’t slip out.
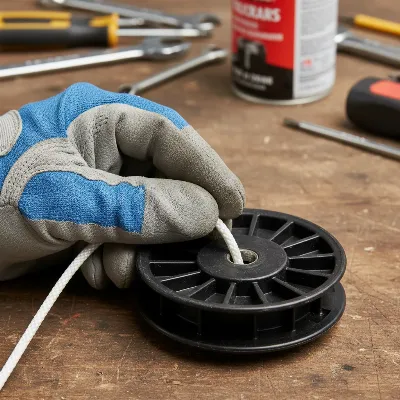 A close-up shot of a hand threading a new pull cord through the hole of a lawn mower recoil starter pulley.
Securing the Cord and Reassembling the Unit
The final steps involve releasing the spring tension, attaching the handle, and putting everything back together.
Once the knot is tied securely inside the pulley, carefully remove the screwdriver that was holding the pulley in place. Slowly allow the spring to retract the cord onto the pulley. Do this gradually, maintaining some control over the cord to prevent it from snapping back too forcefully. Next, thread the remaining loose end of the pull cord through the handle. Tie a sturdy knot at the end of the cord, ensuring it’s close to the handle and will sit flush. Tug on the handle to test the knot and ensure the cord retracts fully into the housing. Finally, align the recoil starter assembly with its mounting points on the engine. Reinstall all the screws or bolts you removed earlier, ensuring they are tightened securely. Reattach any shrouds or covers.
Troubleshooting Common Pull Cord Issues
Even with a careful DIY repair, you might encounter a few minor issues. Here’s how to troubleshoot them:
If the cord is not retracting fully after reassembly, the spring tension might be incorrect. You may need to disassemble the unit again, re-tension the spring by twisting the pulley one or two more revolutions, and then re-lock it before threading the cord. Ensure the cord isn’t binding or rubbing against any internal parts. If the cord feels too long or too short, you can adjust it by untying the knot at the handle, pulling more or less cord through, and re-tying it. Make sure there’s enough slack for a full pull without overextending the spring. If the engine still won’t start after replacing the cord, the issue is likely not with the cord itself. Check other common starting problems like spark plug condition, fuel level, fuel filter, or carburetor issues. The pull cord’s function is purely mechanical, allowing you to attempt to start the engine, not to guarantee it.
Maintenance Tips to Extend Pull Cord Life
Regular maintenance and proper usage can significantly extend the life of your lawn mower’s pull cord and prevent premature breakage.
Always use a proper starting technique. Instead of quick, forceful yanks, pull the cord with a smooth, steady motion until you feel resistance, then give it a firm, continuous pull. Avoid letting the cord snap back violently into the housing; guide it gently as it retracts. Regularly inspect your pull cord for any signs of fraying, cuts, or excessive wear. Catching these issues early allows you to replace the cord before it completely breaks, saving you from a mid-mowing breakdown. During off-season storage, ensure your lawn mower is in a dry environment. Moisture can degrade the cord material over time. Occasionally, cleaning around the recoil starter assembly can prevent dirt and debris from interfering with the cord’s movement.
> “A little proactive care goes a long way. Regularly inspecting your lawn mower’s pull cord for wear and tear is a simple habit that can prevent frustrating breakdowns and extend the life of your equipment.” – Admin, reviewhyeok.com
Conclusion
A broken lawn mower pull cord is a common inconvenience that many homeowners face. However, by following this detailed DIY guide, you can confidently replace the starter rope, re-tension the recoil spring, and get your lawn mower back to work quickly and efficiently. This repair not only saves you money on professional services but also provides valuable experience in maintaining your own equipment. Remember to prioritize safety, use the correct tools, and pay attention to proper spring tension for a successful outcome. With a little effort, your lawn mower will be ready to tackle your lawn care tasks once again. What other DIY lawn mower repairs have you successfully completed that have kept your equipment running smoothly?
Frequently Asked Questions
How long does it take to replace a lawn mower pull cord?
Typically, replacing a lawn mower pull cord can be done in about 30 minutes to an hour, depending on your experience level and how easily the recoil starter assembly can be accessed and disassembled on your specific model. Gathering your tools beforehand can significantly speed up the process.
What kind of rope do I use for a lawn mower pull cord?
You should use a specifically designed starter rope, typically made from nylon or polyester braiding, which offers durability and resistance to wear. It’s crucial to match the thickness (diameter) of the new cord to the original to ensure it fits properly in the pulley and handle.
Can I just tie the old pull cord back together if it breaks?
While a temporary knot might seem like a quick fix, it’s generally not recommended. A tied cord will likely be weaker at the knot, making it prone to breaking again, and the knot itself could jam the recoil mechanism. It’s always best to replace a broken cord with a new, continuous length.
What if the pull cord won’t retract after I replace it?
If your new pull cord isn’t retracting, it’s usually a sign that the recoil spring wasn’t properly re-tensioned during installation. You’ll need to re-open the assembly, check the spring’s position, and ensure it’s wound tightly enough before threading the cord and re-locking the pulley.
Is it hard to replace the recoil spring itself?
Replacing just the recoil spring can be quite challenging due to its intricate and tension-filled nature. For most DIYers, if the spring is broken, it’s often easier and more effective to replace the entire recoil starter assembly, which comes with a new, pre-tensioned spring.
Get our weekly buyer guide
Practical specs, not advice. Unsubscribe anytime.