A dirty lawn mower carburetor can be cleaned quickly without removal for mild issues, or thoroughly by disassembling it for persistent problems, typically restoring engine performance within 1-2 hours. This DIY task addresses common issues like hard starting, rough running, or stalling by clearing fuel residue, dirt, and debris from the carburetor’s intricate passages, which disrupt the vital air-fuel mix.
Understanding Your Lawn Mower Carburetor
The carburetor is a vital component in gasoline-powered lawn mowers, responsible for mixing air and fuel in precise ratios before the mixture enters the engine’s combustion chamber. This fine balance is essential for efficient engine operation, ensuring smooth starting, consistent running, and optimal power output. When the carburetor is clean, fuel flows freely, and the air-fuel mixture is consistent.
However, carburetors are prone to getting dirty. The primary reasons include stale fuel leaving behind sticky varnish and gum deposits, or fine particles of dirt and debris entering the fuel system. Symptoms of a dirty carburetor are unmistakable: your mower may be hard to start, require excessive cranking, exhibit a rough or erratic idle, stall frequently, or produce black smoke from the exhaust. Ignoring these signs can lead to further engine damage or complete failure, making a timely cleaning crucial for your mower’s longevity and performance.
Essential Safety First
Before you begin any work on your lawn mower, safety must be your absolute priority. Taking a few moments to prepare properly can prevent accidents and injuries. Always ensure the lawn mower engine is completely off and has had ample time to cool down. A recently used engine can retain significant heat, posing a burn risk.
The most critical safety step is disconnecting the spark plug wire. This action prevents the engine from accidentally starting while you are working on it, which could lead to severe injury from the moving blades. Simply grip the rubber boot of the spark plug wire and pull it directly away from the spark plug. Wearing appropriate personal protective equipment (PPE) is highly recommended. This includes sturdy work gloves to protect your hands from fuel, sharp edges, and cleaning chemicals, as well as safety glasses to shield your eyes from sprays and debris. Finally, always work in a well-ventilated area, especially when using carburetor cleaners or other solvents, to avoid inhaling harmful fumes.
Tools and Materials You’ll Need
Having the right tools and materials on hand will make the carburetor cleaning process much smoother and more efficient. Before you start, gather the following:
- Carburetor Cleaner: Choose a specialized cleaner designed to dissolve gum, varnish, and carbon deposits. Aerosol cans with a spray nozzle and straw are typically easiest to use.
- Compressed Air: A can of compressed air or an air compressor with a blow gun is invaluable for clearing small passages and drying components.
- Various Brushes: You’ll need a small wire brush for stubborn grime on metal parts, a soft-bristled brush (like an old toothbrush) for delicate components, and possibly a nylon brush.
- Rags or Shop Towels: Essential for wiping away dirt, cleaner, and fuel.
- Screwdrivers: Flathead and Phillips head screwdrivers will be needed for removing covers and disassembling carburetor parts.
- Wrenches/Socket Set: For detaching the carburetor from the engine and opening the carburetor bowl.
- Needle or Thin Wire: A small paper clip or a thin strand of wire is perfect for clearing tiny jets and passages.
- Fuel-Safe Container: For draining old fuel from the carburetor bowl.
- Gloves and Safety Glasses: Always wear these for protection.
- Optional: Fuel Stabilizer: If your issues stem from stale fuel, using a fuel stabilizer in the future can prevent repeat problems.
Cleaning Your Carburetor Without Removal (Quick Method)
If your mower is showing mild symptoms of a dirty carburetor, a quick clean without removing the component can often resolve the issue. This method is faster and less daunting for beginners.
- Preparation: Ensure the mower is off, cool, and the spark plug wire is disconnected.
- Access the Carburetor: Locate the air filter housing, usually found near the top or side of the engine. Remove the outer cover and the air filter itself to expose the carburetor.
- Initial Cleaning: Use compressed air and a small brush to remove any loose grass clippings, dirt, and gunk from the exterior of the carburetor and its linkages. Be careful not to force debris further into the carburetor.
- Spray Exterior: Apply carburetor cleaner to the outer parts of the carburetor and its linkages. Use a brush to scrub away any stubborn deposits.
- Internal Cleaning (Engine Running): Reconnect the spark plug wire temporarily. Start the mower engine and let it warm up for a minute. While the engine is running, spray short bursts of carburetor cleaner directly into the carburetor throat and around its center. The engine may sputter or momentarily stall; this is normal as the cleaner works its way through. Continue for about 30 seconds to a minute, allowing the cleaner to atomize and dissolve internal deposits.
- Run Mower: Let the mower run for another minute or two after spraying to ensure the cleaner is fully cycled through the system.
- Reassemble: Turn off the engine, disconnect the spark plug wire again, and reattach the air filter and its outer casing. Reconnect the spark plug wire.
Test your mower. If the symptoms persist or are severe, a more thorough deep cleaning is likely necessary.
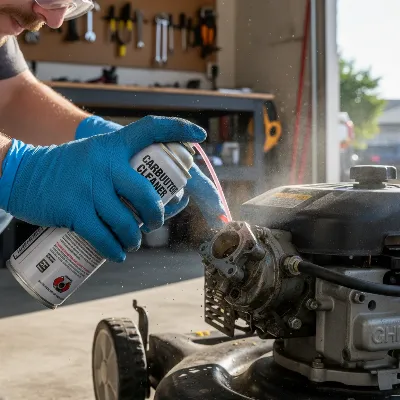 A person spraying carburetor cleaner into a lawn mower carburetor without removing it, with safety glasses and gloves on.
Deep Cleaning Your Carburetor (Removal Required)
For persistent problems or heavily fouled carburetors, removing and disassembling the unit provides the best cleaning results. This method allows you to access and clean all internal passages and jets thoroughly.
- Preparation and Disconnection: Follow all safety precautions: turn off the mower, allow it to cool, and disconnect the spark plug wire. Remove the air filter and its housing. Carefully disconnect the fuel line from the carburetor (have a rag or container ready to catch any fuel). Also, disconnect any throttle linkage or choke cables attached to the carburetor, noting their positions or taking photos for easier reassembly.
- Remove the Carburetor: Using appropriate wrenches or sockets, unbolt the carburetor from the engine. There are usually two bolts holding it in place. Gently pull the carburetor away from the engine, being mindful of any gaskets.
- Disassembly: Once removed, place the carburetor on a clean work surface. Carefully unbolt the carburetor bowl, usually at the bottom. Be prepared for residual fuel to spill out; drain it into a fuel-safe container. Inside, you’ll find the float and needle valve. Remove these components. Locate the main jet, often a small brass fitting in the center post or bottom of the carburetor. Carefully unscrew it. Remove any other small components you can safely detach, keeping track of their exact location and orientation. Taking photos throughout the disassembly process is highly recommended.
- Thorough Cleaning:
- Spray: Generously spray all carburetor components with carburetor cleaner. Focus on every passage, jet, and opening. Let the cleaner soak for a few minutes to break down deposits.
- Brush and Clear: Use your wire brush for any heavy carbon buildup on the metal bowl or exterior. For the main jet and other tiny holes, use a paper clip or thin wire to carefully poke through and dislodge any clogs. Then, respray with cleaner. Use a soft brush for the float and needle valve.
- Compressed Air: After spraying and brushing, use compressed air to blow out all passages, jets, and openings. This is crucial for ensuring no cleaner residue or loosened debris remains. You should be able to see through all the jets and passages once they are clean.
- Drying: Allow all parts to air dry completely. Ensure no moisture remains, especially in intricate passages.
- Reassembly: Carefully reassemble the carburetor in reverse order of disassembly, using your photos as a guide. Ensure all gaskets are properly seated and components are tightened securely but not over-tightened. Replace any worn or damaged gaskets if necessary.
- Reinstallation: Mount the cleaned and reassembled carburetor back onto the engine. Reconnect the fuel line, throttle linkages, and choke cables. Reinstall the air filter and its housing. Finally, reconnect the spark plug wire.
- Test: Start your lawn mower and observe its performance. It may take a few pulls to prime the fuel system, but it should now run more smoothly and reliably.
Common Issues and Troubleshooting After Cleaning
Even after a thorough cleaning, you might encounter some issues. Don’t be discouraged; troubleshooting is part of the DIY process.
- Mower Still Won’t Start or Runs Poorly:
- Clogged Jets: Re-check the main jet and pilot jet (if applicable) for any remaining blockages. A tiny speck can still cause problems. Use a thin wire to ensure they are completely clear.
- Air Filter: A dirty air filter can restrict airflow, mimicking carburetor issues. Ensure it’s clean or replace it if necessary.
- Fuel Supply: Check if fresh fuel is reaching the carburetor. The fuel filter might be clogged, or the fuel line could be pinched.
- Spark Plug: A fouled spark plug can also prevent starting. Clean or replace it.
- Gaskets: Ensure all carburetor gaskets are properly seated and not leaking air. An air leak can cause a lean fuel mixture and rough running.
- Fuel Leaks:
- Carburetor Bowl Gasket: Check if the carburetor bowl gasket is correctly installed and not damaged. Replace if it’s brittle or cracked.
- Fuel Line Connection: Ensure the fuel line is securely attached with its clamp.
- Float Adjustment: An improperly seated or damaged float can cause fuel to overflow. While less common in simple mower carburetors, it’s worth checking if fuel continues to spill.
- Engine Surges or Hunts: This often indicates a lean fuel mixture. Double-check for air leaks around the carburetor mounting or intake manifold gaskets. Ensure all small passages in the carburetor are clear, especially the idle circuit.
If problems persist after these checks, consider consulting your mower’s owner’s manual or seeking professional assistance. Sometimes, a carburetor might be beyond simple cleaning and require a rebuild kit or replacement.
 Close-up of disassembled lawn mower carburetor parts laid out for cleaning, with small brushes and cleaner spray.
Maintaining a Clean Carburetor
Preventing your carburetor from getting dirty in the first place is far easier than cleaning it repeatedly. Adopting a few simple maintenance habits can save you time, frustration, and money in the long run.
The most critical step is managing your fuel. Modern gasoline, especially blends containing ethanol, can degrade quickly, leaving behind sticky varnish and gum that clog carburetor passages. Always use fresh gasoline, preferably no more than 30 days old. For fuel stored longer or for mowers used infrequently, incorporating a high-quality fuel stabilizer is essential. Fuel stabilizers prevent fuel degradation and keep the carburetor clean, especially during off-season storage.
Regularly check and clean your air filter. A clogged air filter restricts airflow to the carburetor, forcing the engine to run with an overly rich fuel mixture, which can also contribute to carbon buildup and poor performance. Clean foam filters with soap and water, and replace paper filters when they become dirty. Consider periodically running a fuel system cleaner designed for small engines through your fuel tank as a preventative measure. This can help dissolve minor deposits before they become major clogs. Finally, avoid leaving old fuel in the mower over extended periods. Drain the fuel tank and run the carburetor dry before storing the mower for the winter.
“A carburetor is like the lungs of your engine. Keep them clear, and your mower will breathe easy, perform reliably, and last for years.” – John Smith, Master Small Engine Mechanic
Conclusion
A dirty carburetor is a common issue that can plague any gasoline-powered lawn mower, leading to frustrating starting problems and poor performance. However, with the right tools and a systematic approach, cleaning your lawn mower carburetor is a manageable DIY task. Whether you opt for the quick, on-mower cleaning method or a more thorough disassembly and deep clean, taking the time to address this component can significantly extend your mower’s lifespan and improve its efficiency. to prioritize safety, work methodically, and consider preventative measures like fresh fuel and fuel stabilizers to keep your carburetor spotless. With a clean carburetor, your lawn mower will be ready to tackle your yard work with renewed vigor.
What are your go-to tips for keeping your lawn mower in top shape?
Frequently Asked Questions
What causes a lawn mower carburetor to get dirty?
|
Our Picks for the Best Lawn Mower in 2026
As an Amazon Associate I earn from qualifying purchases.
|
||
| Num | Product | Action |
|---|---|---|
| 1 | Litheli 40V (2 x 20V) 16" Electric Lawn Mower Cordless, Brushless Lawnmower with 6-Height Adjust, Portable & Lightweight Push Battery Powered Lawn Mower (2 * 4.0AH Batteries Included) |

|
| 2 | LawnMaster MEB1216K Electric Lawn Mower 16-Inch 12AMP |
|
| 3 | CRAFTSMAN Electric Push Lawn Mower, 20-Inch Deck, Corded, Powerful 13-AMP Motor, 6 Setting Height Adjustment, Winged Blades, 3 in 1 Bagging, Mulching and Discharge (CMEMW213) |
|
| 4 | VEVOR Push Lawn Sweeper, 21inch Leaf & Grass Collector, Heavy Duty Thickened Steel Durable to Use with Large Capacity 3.5 cu. ft. Mesh Collection Hopper Bag, 2 Spinning Brushes |
|
| 5 | Litheli Electric Lawn Mower Cordless,Grass Cutter Machine for 1300 Sq.Ft.Lawnmower with Motor,13.2 in Cutting Width,8 Gallon Capacity,Cutting Height from 1 to 2.5 in with 4.0A Battery |
|
| 6 | American Lawn Mower Company 50514 14" 11-Amp Corded Electric Lawn Mower, Black |
|
| 7 | Litheli 20V 13" Cordless Lawn Mower, Electric Lawn Mowers for Garden, Yard and Farm, 5 Heights, with Brushless Motor, 4.0Ah Battery & Charger Included |
|
| 8 | Greenworks 24V 13" Brushless (Push) Cordless Lawn Mower, 4.0Ah Battery and Charger |
|
| 9 | LawnMaster MEB1114K Electric Corded Lawn Mower 15-Inch 11AMP |
|
| 10 | Litheli 13.4inch Electric Lawn Mower Cordless,Grass Cutter Machine for 2600 Sq.Ft.Lawnmower with Brushless Motor, 8 Gallon Capacity, Cutting Height from 1 to 2.5 in, Includes 2X4.0 Ah Battery. |
|
A lawn mower carburetor typically gets dirty due to stale fuel leaving behind varnish and gum deposits, especially gasoline with ethanol. Dirt and debris can also enter the fuel system and clog the carburetor’s small passages, disrupting the air-fuel mixture essential for engine operation.
How often should I clean my lawn mower carburetor?
The frequency depends on usage and fuel quality. If you use your mower regularly with fresh, stabilized fuel, you might only need to clean it every few seasons. However, if you notice symptoms like hard starting, stalling, or rough running, it’s time for a cleaning regardless of the last time it was done.
Can I use household cleaners like vinegar or bleach to clean a carburetor?
No, it is strongly advised not to use household cleaners like vinegar or bleach. Acetic acid in vinegar can cause metal to rust, and bleach (sodium hypochlorite) will corrode metals like steel and aluminum, while also degrading rubber seals in the carburetor. Always use a dedicated carburetor cleaner.
What are the signs that my lawn mower carburetor needs cleaning?
Key signs include difficulty starting the engine, the mower stalling frequently or running rough, an inconsistent or surging idle, and excessive black smoke coming from the exhaust. These indicate that the air-fuel mixture is incorrect due to blockages in the carburetor.
Is it better to clean the carburetor with or without removing it?
Cleaning the carburetor with removal allows for a much more thorough cleaning, as you can disassemble it and access all internal passages and jets directly. The “without removal” method is quicker and suitable for minor issues or as a preventative measure, but it may not resolve severe clogging.
How to Clean a Dirty Lawn Mower Carburetor
This guide provides step-by-step instructions for both quick cleaning and a more thorough deep clean of your lawn mower carburetor, helping to restore engine performance.
Ensure the lawn mower engine is completely off and has cooled down. Disconnect the spark plug wire to prevent accidental starting, which is a critical safety step. Wear sturdy work gloves and safety glasses to protect yourself from fuel, sharp edges, and cleaning chemicals.
Locate and remove the air filter housing to expose the carburetor. Use compressed air and a small brush to remove loose debris from the exterior. With the engine running, spray short bursts of carburetor cleaner directly into the carburetor throat for 30 seconds to a minute, allowing it to dissolve internal deposits.
Disconnect the fuel line, throttle linkage, and choke cables, then unbolt the carburetor from the engine. Disassemble the carburetor by removing the bowl, float, needle valve, and main jet, keeping track of all small components. Generously spray all parts with carburetor cleaner, use brushes and thin wire to clear passages, and then blow out with compressed air.
Allow all cleaned parts to air dry completely before carefully reassembling the carburetor in reverse order, using photos as a guide. Ensure all gaskets are properly seated. Mount the reassembled carburetor back onto the engine, reconnect all lines and cables, and finally, reconnect the spark plug wire.
Start your lawn mower and observe its performance; it should run more smoothly. To prevent future clogs, always use fresh gasoline (no more than 30 days old) and a high-quality fuel stabilizer, especially during off-season storage. Regularly clean or replace your air filter to ensure proper airflow.
Get our weekly buyer guide
Practical specs, not advice. Unsubscribe anytime.
I tried the DIY method to clean my carburetor because my mower was running rough. While it did help a little with the air-fuel mix, I still have some minor issues with consistent running. I think my problem might be a bit more severe than just fuel residue, so I might need to look into a full replacement eventually. Good starting point though.
I’ve been having trouble with my mower stalling out mid-cut, and I was dreading taking it to a shop. This guide on cleaning the carburetor without removal was a lifesaver! It really helped clear out whatever gunk was causing the issue. My engine is running so much smoother now, like new.
My old mower was hard starting every time, and I suspected the carburetor. The detailed steps for disassembling it were super clear, even for someone like me who’s not a mechanic. It took me a bit longer than the 1-2 hours mentioned, but the results are worth it. No more struggling to get it going!
This guide was exactly what I needed! My mower was constantly sputtering and losing power, and I was sure it was a dirty carburetor. Following the instructions, I was able to get it cleaned up and now it’s back to optimal power output. It saved me a ton of money not having to buy a new mower.