For most residential lawn mowers, you should change the oil every 50 hours of operation or at least once a year, whichever comes first, to ensure efficient operation and prolong engine lifespan. Brand new mowers benefit from an initial oil change after the first 5 to 10 hours to remove break-in metal particles. Neglecting this maintenance can lead to serious engine problems and costly repairs, as old oil loses its ability to lubricate, dissipate heat, and clean engine components.
Understanding Your Lawn Mower’s Oil Needs
Engine oil is crucial for your lawn mower, lubricating moving parts to reduce friction, dissipating heat, cleaning contaminants, and preventing rust. Over time, oil degrades from heat, air exposure, and accumulation of dirt, dust, and metal particles. When oil becomes old and dirty, it loses its protective qualities, forcing engine components to work harder and generate more heat.
Determining the ideal oil change frequency depends on several factors beyond the general guideline. Specific conditions and usage patterns can significantly alter the schedule, making it crucial to understand these variables for effective maintenance and peak mower performance.
When to Change Your Lawn Mower Oil
The widely accepted guideline for most residential lawn mowers is to change the oil every 50 hours of operation or at least once a year, whichever comes first. This ensures fresh oil even for infrequently used mowers, as oil degrades from heat and air exposure over time. Some experts suggest slightly different intervals: push mowers may benefit from an oil change every 25-30 hours, while riding mowers typically follow the 50-hour recommendation.
For brand new mowers, an initial oil change after the first 5 to 10 hours of use is highly recommended. This “break-in” oil change removes metal particles generated during initial engine operation. While some newer engines are marketed as “no oil change,” monitoring and considering oil changes is generally best practice to maximize engine longevity, especially for long-term ownership.
Factors that influence oil change frequency include:
- Usage Frequency: Mowers used for large lawns or commercially accumulate hours faster, requiring more frequent changes.
- Operating Conditions: Mowing in dusty, dirty, or very hot environments accelerates oil breakdown and contamination, necessitating shorter intervals.
- Engine Type: Older or smaller engines may be more susceptible to oil degradation and require more regular attention.
- Oil Type: While synthetic oils offer superior protection and withstand higher temperatures, most manufacturers still advise an annual change, even if intervals can be extended.
Signs It’s Time for an Oil Change
Beyond hour counts or seasonal schedules, your lawn mower often provides clear indications that its oil needs attention. Heeding these signs can prevent potential engine damage.
- Dark and Dirty Appearance: Fresh oil is typically clear, amber, or honey-colored. If your dipstick shows dark brown or black oil, resembling used coffee, it strongly indicates contamination and breakdown.
- Gritty Texture: Rubbing a small amount of oil between your fingers reveals grit or fine particles, signaling the presence of wear metals and dirt, which compromises lubricating properties.
- Burnt Smell: A distinct burnt odor from the oil indicates it has been exposed to excessive heat and has begun to break down chemically.
- Decreased Engine Performance: If your mower struggles to start, runs louder, experiences power loss, or sounds rougher, old or low oil could be the cause.
- Low Oil Level: Regularly checking the oil level is crucial. A consistent drop below the recommended mark suggests not only a need to top up but also that the existing oil may be excessively worn or an underlying issue exists.
Ignoring these warning signs can significantly shorten your lawn mower’s life and lead to expensive repairs.
Types of Lawn Mower Engine Oils
Choosing the correct oil type is as important as changing it regularly. Most modern lawn mowers use four-stroke engines, which require specific motor oils, distinct from the fuel-oil mix used by two-stroke engines. Always consult your owner’s manual for the manufacturer’s exact recommendations, as using the wrong oil can harm the engine.
Four-Stroke Engine Oils
|
Our Picks for the Best Lawn Mower in 2026
As an Amazon Associate I earn from qualifying purchases.
|
||
| Num | Product | Action |
|---|---|---|
| 1 | Greenworks 24V 13" Brushless (Push) Cordless Lawn Mower, 4.0Ah Battery and Charger |

|
| 2 | Litheli Electric Lawn Mower Cordless,Grass Cutter Machine for 1300 Sq.Ft.Lawnmower with Motor,13.2 in Cutting Width,8 Gallon Capacity,Cutting Height from 1 to 2.5 in with 4.0A Battery |
|
| 3 | Litheli 40V (2 x 20V) 16" Electric Lawn Mower Cordless, Brushless Lawnmower with 6-Height Adjust, Portable & Lightweight Push Battery Powered Lawn Mower (2 * 4.0AH Batteries Included) |
|
| 4 | VEVOR Push Lawn Sweeper, 21inch Leaf & Grass Collector, Heavy Duty Thickened Steel Durable to Use with Large Capacity 3.5 cu. ft. Mesh Collection Hopper Bag, 2 Spinning Brushes |
|
| 5 | Litheli 20V 13" Cordless Lawn Mower, Electric Lawn Mowers for Garden, Yard and Farm, 5 Heights, with Brushless Motor, 4.0Ah Battery & Charger Included |
|
| 6 | LawnMaster MEB1216K Electric Lawn Mower 16-Inch 12AMP |
|
| 7 | American Lawn Mower Company 50514 14" 11-Amp Corded Electric Lawn Mower, Black |
|
| 8 | Litheli 13.4inch Electric Lawn Mower Cordless,Grass Cutter Machine for 2600 Sq.Ft.Lawnmower with Brushless Motor, 8 Gallon Capacity, Cutting Height from 1 to 2.5 in, Includes 2X4.0 Ah Battery. |
|
| 9 | LawnMaster MEB1114K Electric Corded Lawn Mower 15-Inch 11AMP |
|
| 10 | CRAFTSMAN Electric Push Lawn Mower, 20-Inch Deck, Corded, Powerful 13-AMP Motor, 6 Setting Height Adjustment, Winged Blades, 3 in 1 Bagging, Mulching and Discharge (CMEMW213) |
|
Four-stroke engines, common in push mowers, riding mowers, and zero-turns, have separate compartments for fuel and oil. Here are common oil types and their applications:
- SAE 30: This single-grade oil is widely recommended for warmer temperatures, typically above 40°F (4°C). It’s a popular choice for many small engines in moderate climates.
- SAE 10W-30: A multi-grade oil designed for varying temperature ranges, usually between 0°F and 100°F (-18°C and 38°C). The “W” indicates winter, signifying improved cold-weather flow. While good for cold starts, it might lead to increased oil consumption in very hot conditions (above 80°F/27°C).
- SAE 5W-30: This multi-grade oil provides excellent performance in very cold temperatures, often below 40°F (5°C), or even as low as -20°F (-30°C). It offers improved cold starting with potentially less oil consumption.
- Synthetic SAE 5W-30 / 15W-50: Synthetic oils are engineered for superior protection across all temperature ranges, from extreme cold to intense heat. They provide better stability, lubrication, and can extend engine life. While they don’t necessarily extend recommended oil change intervals for typical residential use, they offer enhanced performance. Commercial applications or continuous heavy use might benefit from heavier synthetics like 15W-50.
- High-Quality Detergent Oil: Regardless of viscosity, always use a high-quality detergent oil classified as “For Service SF, SG, SH, SJ” or higher. These ratings ensure the oil contains additives to keep the engine clean and protect against wear. Avoid using special additives not recommended by the manufacturer.
Two-Stroke Engine Oils
Two-stroke engines operate differently, requiring a specific mixture of gasoline and special two-cycle oil. The oil is mixed directly with the fuel, lubricating the engine as it runs. The ratio (e.g., 50:1 or 40:1) is critical and must be precisely followed according to your mower’s manual. Never use four-stroke engine oil in a two-stroke engine, as it will not provide adequate lubrication and can quickly lead to engine failure.
Consequences of Neglecting Oil Changes
Failing to change your lawn mower’s oil regularly leads to a cascade of problems, significantly impacting performance and shortening equipment life. It’s a preventative maintenance investment that saves money and headaches long-term.
“Your mower works hard, and just like any engine, it needs clean oil to stay healthy,” states Brandon Greene, VP of Customer Solutions at Lucas Oil. “Old, dirty oil can cause overheating, excessive wear on parts, and even kill the engine if you ignore it long enough.”
Here’s what can happen if you consistently skip oil changes:
- Increased Friction and Wear: As oil ages, it loses viscosity and lubricating properties, leading to increased metal-on-metal friction and accelerated wear on critical components like pistons, crankshafts, and bearings.
- Overheating: Dirty oil cannot dissipate heat effectively, causing the engine to run hotter than its optimal temperature. Chronic overheating can warp metal parts and compromise engine seals.
- Sludge Buildup: Contaminants like carbon deposits, fuel residues, and dirt accumulate in old oil, forming thick sludge. This sludge can clog oil passages, restrict oil flow, and starve vital engine parts of lubrication.
- Reduced Performance: An engine struggling with poor lubrication will lose power, run rough, consume more fuel, and may become difficult to start.
- Engine Seizure: In severe cases, prolonged lack of lubrication can cause metal parts to fuse due to excessive friction and heat, leading to a complete engine seizure. At this point, the engine is usually beyond repair, necessitating a costly replacement.
“If you’re not changing oil regularly, you’re basically running your mower on gunk – the dirt, dust, and other debris that gets kicked up and into the engine, and ultimately the oil.” – Brandon Greene, VP of Customer Solutions at Lucas Oil
A Step-by-Step Guide to Safely Changing Your Lawn Mower Oil
Changing your lawn mower oil is a manageable DIY task that requires basic tools and adherence to safety protocols. By following these steps, you can ensure a clean and effective oil change.
Essential Tools and Supplies
Before you begin, gather everything you’ll need:
- New Engine Oil: Ensure it’s the correct type and viscosity recommended by your mower’s manufacturer.
- Oil Drain Pan: A container large enough to collect all the old oil.
- Funnel: To prevent spills when adding new oil.
- Socket Wrench or Oil Filter Wrench: For removing the drain plug and, if applicable, the oil filter.
- New Oil Filter (if applicable): Riding mowers and some larger push mowers have replaceable oil filters.
- Clean Rags or Shop Towels: For wiping spills and cleaning components.
- Thick Work Gloves: To protect your hands from hot oil and sharp edges.
- Safety Glasses or Goggles: To protect your eyes from splashes.
- Spark Plug Wrench (optional): If you plan to check/clean the spark plug simultaneously.
- Cardboard or Plastic Trough (optional): For mowers without a drain plug, to guide oil when tilting.
Safety Precautions Before You Start
Safety is paramount when working with machinery. Always prioritize these steps:
- Read Your Owner’s Manual: This provides specific instructions and safety warnings for your particular model.
- Ensure a Level Surface: Park your lawn mower on a flat, stable surface. For riding mowers, engage the parking brake.
- Disconnect the Spark Plug Wire: This is a critical step to prevent accidental engine starting while you’re working. Pull the wire away from the spark plug.
- Allow Engine to Cool (Partially): While it’s best to warm the oil for easier draining, ensure the engine isn’t scalding hot before you start handling components. Run it for 1-2 minutes, then turn it off and let it sit for a few minutes.
- Wear Protective Gear: Always wear safety glasses and work gloves.
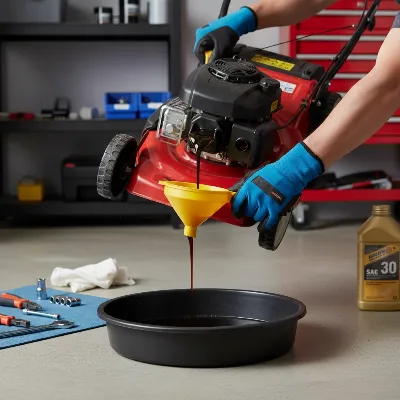 A person safely changing the oil in a lawn mower engine, emphasizing protective gear
Draining the Old Oil
- Locate the Oil Drain Plug: On most push mowers, the drain plug is often a bolt on the underside of the engine or sometimes located on the oil fill tube. For riding mowers, there might be a drain hose or a plug at the bottom of the engine.
- Position the Drain Pan: Place the oil drain pan directly beneath the drain plug or the area where the oil will flow out.
- Remove the Oil Fill Cap/Dipstick: This allows air to enter, facilitating smoother oil flow.
- Remove the Drain Plug: Using your socket wrench, carefully loosen and remove the drain plug. Be mindful that the oil will likely be warm and flow quickly. For mowers without a drain plug, you may need to gently tilt the mower on its side, ensuring the air filter is facing upwards to prevent fuel leakage.
- Allow Complete Drainage: Let the oil drain completely into the pan. This may take several minutes.
- Replace the Drain Plug: Once the oil has fully drained, clean the drain plug and its surrounding area. Reinstall the drain plug securely, but do not overtighten it.
Replacing the Oil Filter (if applicable)
If your lawn mower has an oil filter (typically found on riding mowers and some larger push mowers):
- Position Drain Pan: Move the drain pan beneath the oil filter.
- Remove Old Filter: Use an oil filter wrench to turn the old filter counter-clockwise until it loosens. Be prepared for a small amount of oil to spill out.
- Clean Area: Wipe down the oil filter mounting area with a clean rag.
- Prepare New Filter: Apply a thin film of fresh oil to the rubber gasket of the new oil filter. This helps create a good seal.
- Install New Filter: Screw the new filter on by hand until the gasket makes contact with the engine. Then, tighten it an additional half to three-quarters of a turn using the wrench. Do not overtighten.
Adding New Oil
- Refill with Fresh Oil: Place a funnel into the oil fill tube. Carefully pour the new, recommended oil into the engine. Refer to your owner’s manual for the exact oil capacity. Avoid pouring too quickly to prevent spills.
- Check Oil Level: After adding most of the recommended amount, wait a few minutes for the oil to settle. Insert the dipstick (after wiping it clean), push it all the way in, and then remove it to check the level. The oil should be between the “Add” and “Full” marks. Add small amounts of oil as needed until the correct level is reached. Do not overfill, as this can also cause engine damage.
- Replace Oil Fill Cap/Dipstick: Once the oil level is correct, securely replace the oil fill cap or dipstick.
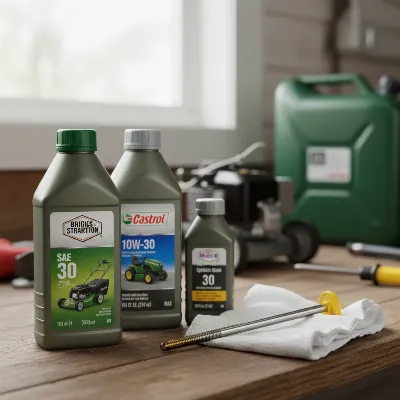 Various bottles of lawn mower oil types and an oil dipstick, illustrating selection
Post-Change Checks and Proper Disposal
- Reconnect Spark Plug Wire: Reattach the spark plug wire firmly to the spark plug.
- Check for Leaks: Start the engine and let it run for a few minutes. Turn it off and check around the drain plug and oil filter (if applicable) for any leaks.
- Dispose of Used Oil: Never pour used motor oil down drains or onto the ground. It is an environmental pollutant. Pour the old oil from your drain pan into an empty, sealable container (like the bottle the new oil came in). Take it to an automotive parts store or a local recycling center that accepts used motor oil for proper disposal.
Common Oil-Related Issues and Troubleshooting
Even with regular maintenance, issues can arise. Understanding common oil-related problems can help you diagnose and address them promptly, preventing further damage to your lawn mower.
Low Oil Level and Its Consequences
A low oil level is one of the most direct threats to your engine. Without sufficient lubrication, metal parts grind against each other, leading to rapid wear, excessive heat, and eventually, engine failure.
- Troubleshooting: Regularly check your oil level before each use, or at least every few uses, using the dipstick. If it’s consistently low, top it up to the “Full” mark. Investigate if there’s a leak (look for oil stains under the mower) or if the engine is burning oil (indicated by blue smoke from the exhaust).
Overfilling the Oil Reservoir
While underfilling is problematic, overfilling the oil can be equally damaging. Too much oil can cause excessive pressure within the crankcase, leading to seal failures and oil leaks. It can also cause the crankshaft to churn the oil, aerating it and forming foam, which reduces its lubricating effectiveness.
- Troubleshooting: If you accidentally overfill, drain a small amount of oil until the level is within the safe range on the dipstick. This might involve loosening the drain plug briefly or using a small oil suction pump.
Using the Wrong Type or Grade of Oil
Using an oil with the incorrect viscosity or specifications can lead to poor lubrication. For example, an oil that’s too thick might not flow well in cold weather, while an oil that’s too thin might not provide adequate protection in hot conditions.
- Troubleshooting: Always refer to your owner’s manual for the precise oil type and grade. If you’ve used the wrong oil, it’s best to drain it immediately and refill with the correct type. Do not mix different types or grades of oil unless specifically advised by the manufacturer.
Engine Overheating
Overheating can stem from several issues, and old, dirty oil is a common contributor. If the oil cannot effectively dissipate heat, the engine temperature will rise. Other factors like a clogged air filter or debris around the engine’s cooling fins can also contribute.
- Troubleshooting: Check your oil’s condition and level. Ensure the air filter is clean and replace it if necessary. Clear any grass clippings or debris from around the engine’s cooling fins. If overheating persists after addressing these, consult a professional.
By being vigilant about oil condition and addressing issues promptly, you can ensure your lawn mower performs reliably and lasts for many seasons.
Conclusion
Regular oil changes are non-negotiable for the health and longevity of your lawn mower’s engine. By adhering to the recommended schedule of every 50 hours of use or annually, and understanding the nuances of oil types and proper change procedures, you can prevent premature wear, avoid costly repairs, and ensure your equipment runs smoothly for years to come. Taking the time for this simple maintenance task is a small investment that yields significant returns in performance and reliability. Don’t let dirty oil turn your trusty lawn mower into a costly headache. What steps will you take this season to prioritize your lawn mower’s oil health?
Frequently Asked Questions
What happens if I never change my lawn mower oil?
If you never change your lawn mower’s oil, it will eventually become thick with contaminants, losing its lubricating and cooling abilities. This leads to increased friction, overheating, accelerated engine wear, and can ultimately cause the engine to seize completely, requiring a full replacement.
Can I use car oil in my lawn mower?
While some 4-stroke lawn mower engines might tolerate certain types of car oil (like 10W-30), it’s generally best to use oil specifically formulated for small engines, as recommended by your mower’s manufacturer. Car oils may have different additive packages not suited for the unique operating conditions of a lawn mower engine. Never use car oil in a 2-stroke engine.
How do I check my lawn mower oil level?
To check your lawn mower oil, first ensure the mower is on a level surface and the engine is cool. Locate the oil fill cap, which often has a dipstick attached. Remove the dipstick, wipe it clean, reinsert it fully, then remove it again. The oil level should fall between the “Add” and “Full” marks on the dipstick.
How much oil does a lawn mower typically hold?
The oil capacity varies by mower type and engine size. Walk-behind mowers often hold between 15 to 18 ounces, while riding mowers typically require 48 to 64 ounces. Always consult your owner’s manual for the exact capacity of your specific model to avoid under- or overfilling.
Is synthetic oil better for my lawn mower?
Synthetic oil offers superior protection and stability across a wider range of temperatures compared to conventional oil, providing enhanced lubrication and potentially less oil consumption. While it may not extend standard annual oil change intervals for residential use, it offers increased engine safeguarding, especially in challenging conditions.
Can I change my lawn mower oil myself?
Yes, changing your lawn mower’s oil is a straightforward DIY maintenance task. With the right tools, new oil, and by following proper safety precautions and step-by-step instructions, most homeowners can successfully perform an oil change without needing professional assistance.
Get our weekly buyer guide
Practical specs, not advice. Unsubscribe anytime.
I’ve been pretty good about changing my mower’s oil once a year, but I never really tracked the operating hours. Knowing that 50 hours is the general guideline for residential mowers gives me a much better benchmark. My old oil was definitely looking pretty dark last time, so it’s clear how important it is to keep up with this.
I always forget about the initial oil change for new mowers, so it was super helpful to be reminded about doing it after the first 5 to 10 hours. My new Cub Cadet is running like a dream, and I want to keep it that way. This guide made the whole process feel less daunting, even for someone who’s not super mechanically inclined.
This was a lifesaver! I’ve been neglecting my lawn mower’s oil changes for a while, and it was starting to sound rough. The explanation about old oil losing its ability to lubricate and dissipate heat really hit home. I followed the steps, and my mower is already running much smoother. Definitely saved me from costly repairs.
Good info on why oil degrades over time and how it loses its protective qualities. I appreciate the emphasis on preventing rust and cleaning contaminants. My only minor complaint is that I wish there was a quick list of recommended oil types for different engine brands, but overall it’s a solid guide for maintenance.