Sharpening dull lawn mower blades is a straightforward DIY task that restores your lawn’s pristine appearance and your mower’s efficiency. Dull blades tear grass, making your lawn look unhealthy and prone to disease, while also straining the mower’s engine and increasing fuel consumption. By following a few simple steps, you can achieve cleaner cuts and extend your mower’s lifespan, saving time and money.
Understanding the Importance of Sharp Lawn Mower Blades
Sharp lawn mower blades are fundamental to a healthy, vibrant lawn. When blades are sharp, they cleanly slice through each blade of grass, similar to how scissors cut paper. This precise cut minimizes stress on the grass, allowing it to heal quickly and grow robustly. Conversely, dull blades rip and tear the grass, leaving frayed ends that are susceptible to disease, pest infestation, and browning. A sharp blade also ensures your mower operates efficiently, reducing engine strain and improving fuel economy or battery life, making your mowing experience smoother and more effective.
Identifying When Your Blades Need Sharpening
Knowing when your lawn mower blades require attention is crucial for maintaining lawn health and mower performance. Regularly inspecting your blades is a good habit, but your lawn itself often provides the most obvious clues.
The most common sign of dull blades is the appearance of your lawn after mowing. Instead of clean, even cuts, you’ll see ragged, torn, or browned tips on the grass blades. Your lawn might also look uneven or patchy, requiring multiple passes to achieve a satisfactory cut. A dull blade forces your mower’s engine to work harder, which you might notice as increased effort to push the mower, louder operation, or even a tendency for the engine to bog down, especially in thicker grass. Visible nicks, dents, or a rounded edge on the blade are also clear indicators that sharpening is overdue. Generally, experts recommend sharpening blades after every 20 to 25 hours of use, or at least once or twice per mowing season for the average homeowner.
Choosing the Right Sharpening Tools
Selecting the appropriate tool is key to achieving a well-sharpened lawn mower blade. Various tools are available for DIY sharpening, ranging from simple hand files to electric grinders, each offering different levels of speed, precision, and ease of use.
For manual sharpening, a 10-inch or 12-inch flat mill file (often called a “bastard cut” file) is a popular, inexpensive, and effective choice that allows for precise control. Drill-powered blade sharpeners, featuring a grinding stone with a preset angle, offer a faster method by attaching to a standard power drill. For those with more experience and seeking quick results, an angle grinder with a flap disc can sharpen blades efficiently. Regardless of the tool, a sturdy workbench vise is essential for securely clamping the blade during the sharpening process, ensuring safety and stability.
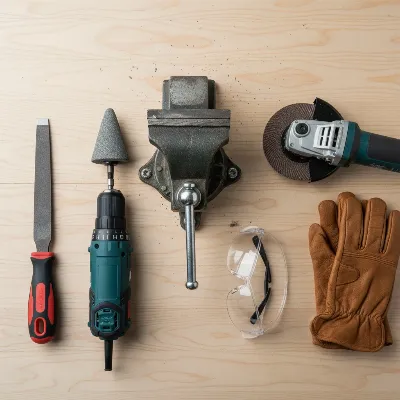 Assortment of tools for sharpening lawn mower blades, including files and drill attachments
Essential Safety Precautions
Before you begin sharpening your lawn mower blades, prioritizing safety is paramount. Blades can be sharp even when dull, and sharpening processes involve sparks, metal shavings, and moving parts.
Always start by disconnecting the spark plug wire on gas mowers or removing the battery/unplugging the cord on electric models to prevent accidental starting. Wear heavy-duty work gloves to protect your hands from cuts and abrasions, and safety glasses or goggles to shield your eyes from flying debris. If using power tools like angle grinders, ear protection is also highly recommended. Securely clamp the blade in a vise to prevent it from slipping or moving during sharpening, which could lead to serious injury. Ensure your work area is clean, well-lit, and free of flammable materials.
Step-by-Step Guide to Sharpening Your Lawn Mower Blades
Sharpening your lawn mower blades can be broken down into several manageable steps, ensuring a sharp, balanced blade ready for action.
1. Removing and Cleaning the Blade
|
Our Picks for the Best Lawn Mower in 2026
As an Amazon Associate I earn from qualifying purchases.
|
||
| Num | Product | Action |
|---|---|---|
| 1 | Litheli 40V (2 x 20V) 16" Electric Lawn Mower Cordless, Brushless Lawnmower with 6-Height Adjust, Portable & Lightweight Push Battery Powered Lawn Mower (2 * 4.0AH Batteries Included) |

|
| 2 | Litheli 20V 13" Cordless Lawn Mower, Electric Lawn Mowers for Garden, Yard and Farm, 5 Heights, with Brushless Motor, 4.0Ah Battery & Charger Included |
|
| 3 | LawnMaster MEB1114K Electric Corded Lawn Mower 15-Inch 11AMP |
|
| 4 | American Lawn Mower Company 50514 14" 11-Amp Corded Electric Lawn Mower, Black |
|
| 5 | Litheli 13.4inch Electric Lawn Mower Cordless,Grass Cutter Machine for 2600 Sq.Ft.Lawnmower with Brushless Motor, 8 Gallon Capacity, Cutting Height from 1 to 2.5 in, Includes 2X4.0 Ah Battery. |
|
| 6 | VEVOR Push Lawn Sweeper, 21inch Leaf & Grass Collector, Heavy Duty Thickened Steel Durable to Use with Large Capacity 3.5 cu. ft. Mesh Collection Hopper Bag, 2 Spinning Brushes |
|
| 7 | Litheli Electric Lawn Mower Cordless,Grass Cutter Machine for 1300 Sq.Ft.Lawnmower with Motor,13.2 in Cutting Width,8 Gallon Capacity,Cutting Height from 1 to 2.5 in with 4.0A Battery |
|
| 8 | CRAFTSMAN Electric Push Lawn Mower, 20-Inch Deck, Corded, Powerful 13-AMP Motor, 6 Setting Height Adjustment, Winged Blades, 3 in 1 Bagging, Mulching and Discharge (CMEMW213) |
|
| 9 | LawnMaster MEB1216K Electric Lawn Mower 16-Inch 12AMP |
|
| 10 | Greenworks 24V 13" Brushless (Push) Cordless Lawn Mower, 4.0Ah Battery and Charger |
|
First, prepare your mower by disconnecting its power source. For gas mowers, tilt the mower onto its side with the carburetor and air filter facing upwards to prevent oil and gas leaks. Use a block of wood or a blade removal tool to hold the blade steady, then use a socket wrench to loosen and remove the retaining bolt and the blade. Once removed, thoroughly clean the blade with a wire brush or scraper to remove any caked-on grass clippings, dirt, and rust. A clean blade allows you to clearly see the existing bevel and any damage, which is crucial for proper sharpening.
2. Sharpening the Blade (Choose Your Method)
The goal is to match the blade’s existing cutting angle, typically around 40-45 degrees, and remove minimal material to restore a keen edge without making it razor-sharp, which dulls faster.
- Using a Hand File: Clamp the clean blade securely in a vise. Position the file so it matches the existing bevel of the blade. Using firm, consistent pressure, push the file in one direction across the modern, lifting it on the return stroke. Avoid sawing back and forth. Make several strokes on one side until you achieve a consistent edge, then flip the blade and repeat on the other side. Aim for a sharpness similar to a butter knife, removing any burrs with light pressure or a finer file.
- Using a Drill-Powered Sharpener: Insert the sharpener’s shank into your drill chuck and tighten. Clamp the blade in a vise. Place the sharpener over the modern, ensuring the flat guide rests against the back of the blade and the modern fits within the grinding stone’s bevel. Start the drill at medium-to-high speed and apply light, consistent pressure, moving the sharpener back and forth along the edge. After a few passes, check the edge for sharpness and remove any burrs.
- Using an Angle Grinder: This method requires more experience. Wear eye and ear protection. Secure the blade in a vise. Using an angle grinder with a flap disc, align the grinder with the blade’s existing bevel. With light, consistent pressure, move the grinder slowly and continuously across the modern, from heel to tip, ensuring even material removal. Avoid holding the grinder in one spot to prevent overheating and damaging the blade. Repeat on the other side.
3. Balancing the Blade
A balanced blade is critical for smooth mower operation and preventing excessive vibration, which can damage the mower and cause uneven cuts. After sharpening, check the blade’s balance using a blade balancer. If one side is heavier, carefully remove a small amount of metal from the heavier side (usually the underside) with your sharpening tool until the blade hangs level. This step ensures that the blade spins evenly and efficiently.
4. Reinstalling the Blade
Once the blade is sharp and balanced, reinstall it onto your mower. Ensure the modern is facing the correct direction, typically with the angled side facing up towards the mower deck. Tighten the retaining bolt securely according to your mower’s specifications, but avoid overtightening. Reconnect the spark plug wire or replace the battery, and your mower is ready for a cleaner cut.
> “A well-sharpened and balanced blade is the single most impactful factor for a clean-cut lawn and extended mower life.” – Admin, reviewhyeok.com, Lawn Mower Technician
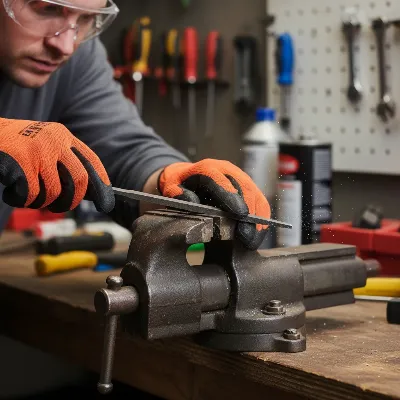 Person sharpening a lawn mower blade with a file, showing proper technique and safety gear
Maintaining Your Sharpened Blades
Proper maintenance extends the life of your sharpened blades and ensures consistent cutting performance.
After each use, clean your mower deck and blades thoroughly to prevent grass clippings and debris from building up. This buildup can throw the blade off balance and encourage rust. Store your mower in a dry place to prevent corrosion. Avoid mowing over rocks, roots, or other hard objects, as these can quickly nick or dull your blades. If you frequently encounter such obstacles, consider keeping a spare set of sharpened blades on hand, allowing you to quickly swap them out and sharpen the dull set at your convenience. This practice minimizes downtime and ensures you always have a sharp blade ready.
Common Mistakes to Avoid and Troubleshooting
Even with the best intentions, DIY sharpening can go wrong. Here are common pitfalls and how to avoid them:
- Over-sharpening: Making the blade razor-sharp will cause it to dull faster. A butter-knife sharpness is ideal for cutting grass.
- Changing the angle: Deviating from the blade’s original cutting angle can reduce cutting efficiency and potentially damage the blade or mower.
- Uneven sharpening: Not sharpening both sides equally can throw the blade out of balance. Always check balance after sharpening.
- Overheating the blade: Using power grinders for too long in one spot can generate excessive heat, weakening the blade’s temper. Apply light pressure and keep the tool moving.
- Ignoring safety: Neglecting safety gear or not disconnecting the power source can lead to serious injury.
If your lawn still looks ragged after sharpening, double-check the blade balance, ensure the correct sharpening angle was maintained, and confirm the blade is installed facing the proper direction. If the blade has significant nicks, bends, or structural damage, replacement might be a safer and more effective option than continued sharpening.
Table Comparing Blade Sharpening Methods
| Method | Tools Required | Difficulty | Speed | Precision | Cost | Best For |
|---|---|---|---|---|---|---|
| Hand File | Mill file, vise, blade balancer | Low | Slow | High | Low | Occasional sharpening, minor dullness, control |
| Drill-Powered Sharpener | Drill, sharpener attachment, vise, blade balancer | Medium | Medium | Medium | Low-Medium | Regular maintenance, quick touch-ups |
| Angle Grinder | Angle grinder, flap disc, vise, safety gear, blade balancer | High | Fast | Medium | Medium-High | Experienced users, significant dullness |
Conclusion
Maintaining sharp lawn mower blades is a simple yet impactful DIY task that significantly benefits your lawn’s health and your mower’s longevity. By following proper safety precautions, choosing the right tools, and carefully executing the sharpening and balancing steps, you can achieve cleaner cuts and a more efficient mowing experience. Regularly checking your blades and addressing dullness promptly will ensure your lawn remains a lush, green shows your care. Don’t let dull blades undermine your efforts; a few minutes of DIY sharpening can make all the difference.
What improvements have you noticed in your lawn after sharpening your mower blades?
Frequently Asked Questions
How often should I sharpen my lawn mower blades?
Most homeowners should sharpen their lawn mower blades every 20 to 25 hours of use, which typically translates to once or twice per mowing season. More frequent sharpening may be necessary if you frequently mow tough grass, sandy terrain, or accidentally hit obstacles.
Can I sharpen my lawn mower blades without removing them?
While some methods exist for sharpening blades directly on the mower, it's generally recommended to remove the blade for a safer, more thorough, and accurate sharpening and balancing process. Sharpening on the mower can make it challenging to maintain the correct angle and properly balance the blade.
How sharp should a lawn mower blade be for optimal cutting?
A lawn mower blade does not need to be razor-sharp; aim for a sharpness comparable to a butter knife or a slightly dull axe. An excessively sharp edge will dull more quickly and can be more prone to chipping. The key is a clean, consistent cutting edge that efficiently slices grass rather than tearing it.
What are the dangers of using dull lawn mower blades?
Using dull lawn mower blades can severely damage your lawn, leaving grass torn, brown, and susceptible to disease. It also puts undue strain on your mower's engine, leading to reduced efficiency, increased fuel consumption, premature wear and tear on components, and potentially costly repairs down the line.
How do I balance a sharpened lawn mower blade?
After sharpening, check your blade's balance using a specialized blade balancer or by hanging it on a nail through the center hole. If one side dips, it's heavier. Carefully remove a small amount of metal from the underside of the heavier side using your sharpening tool until the blade hangs level, ensuring smooth and vibration-free operation.
Sharpen Your Lawn Mower Blades
This guide provides a step-by-step process for safely and effectively sharpening your lawn mower blades using common DIY tools, ensuring a cleaner cut and extending your mower's life.
Disconnect the mower's power source (spark plug or battery). Tilt gas mowers with the carburetor up to prevent leaks. Use a block of wood to steady the blade, then remove the retaining bolt with a socket wrench. Clean the blade thoroughly with a wire brush to remove debris and rust.
Clamp the blade securely in a vise. Using a hand file, drill-powered sharpener, or angle grinder, match the blade's existing 40-45 degree cutting angle. Apply consistent pressure, moving the tool in one direction to create a butter-knife sharpness, avoiding a razor-sharp edge which dulls faster.
After sharpening, check the blade's balance using a blade balancer. If one side is heavier, carefully remove a small amount of metal from the underside of that side with your sharpening tool. Continue until the blade hangs level, preventing mower vibration and uneven cuts.
Reinstall the sharpened and balanced blade onto your mower, ensuring the cutting edge faces the correct direction (angled side up). Tighten the retaining bolt securely according to your mower's specifications. Reconnect the spark plug wire or replace the battery, and your mower is ready for use.
Get our weekly buyer guide
Practical specs, not advice. Unsubscribe anytime.
This is exactly what I needed! My mower was really struggling, and I could tell the blades were dull because the grass looked so unhealthy after mowing. Following the steps to sharpen them has made a huge difference. The engine isn’t straining anymore, and my lawn actually looks green and vibrant again.
I used to just replace my blades when they got dull, but this guide on sharpening them is a game-changer. I followed the steps for using a file and it was way easier than I thought. My lawn looks so much better now, no more torn grass blades. Definitely saving money by doing this myself!
The instructions were pretty clear, especially about how a clean cut minimizes stress on the grass. I tried sharpening my old blades with a Dremel, but I think they were just too far gone. It helped a bit, but I still ended up buying new ones. Maybe I’ll have better luck next time when they’re not so bad.
I’ve always known sharp blades were important for a healthy lawn, but I was intimidated to try sharpening them myself. The explanation about how dull blades tear grass and make it prone to disease really motivated me. I tried the bench grinder method and it worked great, though it took me a little longer to get the hang of the angle.